
This tutorial is my own design and any resemblance to any other tutorial is purely coincidental. It was created in Paint Shop Pro V8. © 2010 - Yvonne - Yorkshire Lass Designs - All rights reserved. You will need the following to complete this tutorial: Tubes JER_Drawings of Krzyszto1 yoka-misted-faces-Guy-020608-small lizztish_breakfast-delights5 yp_keys yp_wordart_love yp_wordart_precious Edge dots 01 Save these items to a folder on your computer Plugins Mura Meister's Cloud 2.2 http://web.archive.org/web/20071016073416/www.geocities.com/murakuma/mmplugins.html Extract to your Plugins folder *********** Drag this arrow with you to mark your place in the tutorial Drag and Drop Script from Dynamic Drive 
********** INSTRUCTIONS In your Materials Palette load Foreground with White #FFFFFF and Background with Yellow #F7DA96 Open a new canvas 600 x 550 transparent background Flood fill with Yellow #F7DA96 Effects >> Plug Ins >> Mura Meister >> Cloud with the following settings: 
Click OK Open lizztish_breakfast-delight5 Edit >> Copy >> Edit >> Paste as New Layer on your canvas Image >> Rotate >> Free Rotate with the following settings 
Click OK With the Move Tool position in the top left-hand corner In the Layers Palette change the blend mode to Luminance(Legacy) and lower the opacity to "14" Layers >> Duplicate Image >> Mirror Image >> Flip This is what you should have now 
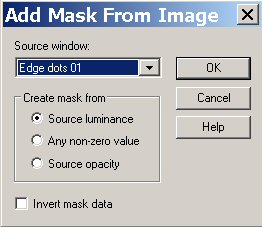
Open Yoka-Misted-Faces-Guy-020608-small Edit >> Copy >> Edit >> Paste as New Layer on your canvas With the Move Tool re-position in top right-hand corner In the Layers Palette lower the opacity to "54" Open JER_Drawings of Krzyszto1 Edit >> Copy >> Edit >> Paste as New Layer on your canvas With the Move Tool re-position in the bottom left-hand corner In the Layers Palette change the blend mode to Luminance(Legacy) and lower the opacity to "40" Layers >> Arrange >> Move Down In the Layers Palette highlight Raster 3 Open yp_wordart_love Edit >> Copy >> Edit >> Paste as New Layer on your canvas With Move Tool re-position in the top left-hand corner See finished tag for placement Open yp_wordart_precious Edit >> Copy >> Edit >> Paste as New Layer on your canvas With Move Tool re-position in the bottom right-hand corner See finished tag for placement Open yp_keys Edit >> Copy >> Edit >> Paste as New Layer on your canvas Image >> Resize=55% All layers unchecked With the Move Tool re-position next to the word "Love" See finished tag for placement Adjust >> Sharpness >> Sharpen Effects >> 3D Effects >> Drop Shadow Vertical and Horizontal Offsets=2 Opacity=100 Blur=5 Colour=Dark Grey #404040 Layers >> Merge >> Merge Visible Layers >> New Raster Layer Flood fill with Yellow #F7DA96 Layers >> Arrange >> Move Down In the Layers Palette highlight Merged layer Image >> Resize 85% All layers unchecked Adjust >> Sharpness >> Sharpen Open Edge dots 01 In the Layers palette of your canvas highlight Raster 1 Layers >> New Mask Layer >> From Image Select Edge dots 01 from the drop down list 
Click OK Layers >> Merge >> Merge Group Layers >> Merge >> Merge All (Flatten) Image >> Add Borders with the following setting 
Click OK Image >> Add Borders Change the pixel size to "10" and the colour to Yellow #F7DA96 Add your name and/or watermark Layers >> Merge >> Merge All (Flatten) Resize if desired Save as a jpg I hope you enjoyed this tutorial If you have any questions or would like to show me your result EMAIL ME VERSIONS FROM MY TRANSLATORS Thank you Isabella, Sognografic Web Design (Italy) 
BACK TO TUTORIALS - PAGE 1 |