

This tutorial is my own design and any resemblance to any other tutorial is purely coincidental. It was created in Paint Shop Pro V8. © 2010 - Yorkshire Lass Designs - All rights reserved. You will need the following to complete this tutorial: ccharisse_tagback2_co (mask) yp_lady_in_red_hat (tube) yp_wordart_wistful The above can be downloaded here Extract these to a file on your computer Eyecandy 3.1 Available from PSP Designers Studio Extract to your Plugins folder ****************** Drag this arrow with you to mark your place in the tutorial Drag and Drop Script from Dynamic Drive ***************** INSTRUCTIONS Open the mask, tube and word art and minimise on your workspace Open a new canvas 600 x 450 pixels, white background Layers >> Promote Background Layer In your Materials Palette load foreground with #EE6C66 Dark Pink Layers >> New Raster Layer Flood fill this layer with the foreground colour Layers >> New Mask Layer >> From Image Select mask ccharisse_tagback2_co from the drop down list 
Click OK Layers >> Merge >> Merge Group Image >> Mirror In the Materials Palette load the foreground with #F9DFDB Pale Pink and the Background with #FFFFFF White Make a foreground-background gradient Style = rectangular with the following settings: 
Click OK In the Layers Palette highlight Raster 1 Flood fill with the gradient Window >> Duplicate Working on the duplicate copy Image >> Resize 45% Resize all layers checked Layers >> Merge >> Merge All (Flatten) Image >> Add Borders with the following settings 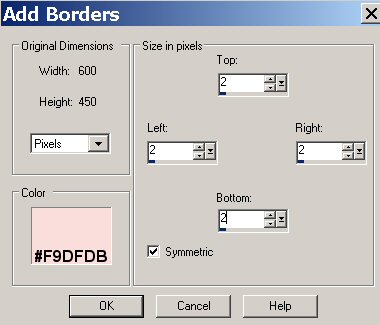
Click OK This tile will be used later, minimise or save as a psp.image then minimise Back to the original copy In the layers Palette highlight Group-Raster 2 Image >> Resize 75% Resize all Layers unchecked Adjust >> Sharpness >> Sharpen With the Mover Tool re-position so that the top right-hand corner is at the co-ordinates 20, 570 
Layers >> Duplicate Image >> Flip Maximise the tile we made earlier Edit >> Copy Edit >> Paste >> Paste as a New Layer on your working canvas With the Move Tool re-position so that the top left-hand corner of the tile is at the co-ordinates 20,20 Layers >> Duplicate Image >> Flip This is what you should have now 
Maximise yp_lady_in_red_hat Edit >> Copy Edit >> Paste as New Layer on your working canvas Image >> Resize 75% Resize all layers unchecked Adjust >> Sharpness >> Sharpen With the Move Tool re-position (see finished tag for placement) Effects >> Plugins >> Eye Candy 3.1 >> Drop Shadow with the following settings: 
Layers >> Merge >> Merge All (Flatten) Image >> Add Borders same settings as before Size in pixels = 2 Colour = #F9DFDB Pale Pink Symmetric checked Image >> Add Borders with these settings: 
In the Materials Palette load the gradient increase the Repeats to 7 Click OK With the Magic Wand select the white border Flood fill with gradient Selections >> Select None Image >> Add Borders Size in pixels = 2 Colour = #F9DFDB Pale Pink Symmetric checked Maximise yp_wordart_wistful Edit >> Copy Edit >> Paste as New Layer on the working canvas With the Move Tool re-position in the top right-hand corner See finished tag for placement Add your name and/or watermark Resize if desired Save as a jpg I hope you enjoyed this tutorial If you have any questions or would like to show me your result EMAIL ME VERSIONS FROM MY TRANSLATORS Thank you Karin, DesignPSP.NL (The Netherlands)
Thank you Isabella, Sognografic Web Design (Italy) 
BACK TO TUTORIALS - PAGE 1 MENU |

