|

This tutorial is my own design and any resemblance to any other tutorial is purely coincidental. It was created in Paint Shop Pro V8. © April 2011 - Yvonne - Yorkshire Lass Designs - All Rights Reserved ~ Revised March 2012 ~ You will need the following to complete this tutorial Masks Mask 058 images_1217491084_masques Tubes yp-purpledaisy yp_tatty_teddy_easter_surprise yp_wordart_easter_brings The above can be downloaded here Download and extract supplies to a file on your computer then open in PSP and minimise ********** Drag this arrow with you to mark your place in the tutorial 
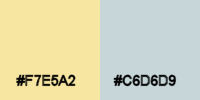
********** NOTE: Depending on the version of PSP you are using the flowers in this tutorial may appear darker. STEP 1 Open a new canvas 800 x 600 pixels white. Layers >> Promote Background Layer STEP 2 In the Materials Palette load Foreground with Yellow #F7E5A2 and Background with Blue #C6D6D9 
Make a foreground-background gradient Style=Linear 
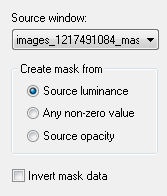
STEP 3 Layers >> New Raster Layer Flood fill this layer with the gradient. STEP 4 Layers >> New Mask Layer >> From Image Select images_1217491084_masques from the dropdown list 
Layers >> Merge >> Merge Group STEP 5 Layers >> New Mask Layer >> From Image Select Mask 058 from the dropdown list 
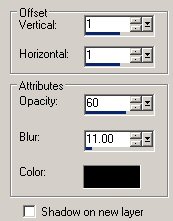
Layers >> Merge >> Merge Group STEP 6 Maximise tube yp_tatty_teddy_easter_surprise.psp Edit >> Copy Minimise tube Edit >> Paste >> Paste as New Layer Image >> Resize 75% All layers unchecked Effects >> 3D Effects >> Drop Shadow 
With the Move Tool position as below 
Adjust >> Sharpness >> Sharpen STEP 7 Maximise tube yp_purpledaisy.psp Edit >> Copy Minimise tube Edit >> Paste >> Paste as New Layer STEP 8 With the Selection Tool >> Freehand Selection 
select the green stem. 
Hit delete. Adjust >> Hue and Saturation >> Colorize Hue=33/Saturation=215 STEP 9 In the layers palette check that Raster 3 is highlighted Layers >> Duplicate Rename layer "Small" Image >> Resize 30% All layers unchecked Adjust >> Sharpness >> Sharpen Effects >> 3D Effects >> Drop Shadow Same settings as in STEP 6 Effects >> Edge Effects >> Enhance With the Move Tool position to the lower left See finished tag for placement STEP 10 In the layers palette check that "Small" is highlighted. Layers >> Duplicate Image >> Mirror With the Move Tool movie position to the right of the first small daisy See finished image for placement STEP 11 In the layer palette highlight Raster 3 Move below Raster 2 and adjust position to top right Layers >> Duplicate Image >> Mirror Re-position to the bottom right See finished image for placement STEP 12 In the layer palette highlight Raster 3 Lower layer opacity to 50 STEP 13 Still in the layer palette, highlight Copy of Raster 3 Lower layer opacity to 80 Effects >> 3D Effects >> Drop Shadow Same settings as in STEP 6 STEP 14 Maximise tube yp_wordart_easter_brings3.psp Edit >> Copy Minimise tube Edit >> Paste as New Layer Move into position. Effects >> 3D Effects >> Drop Shadow Same settings as in STEP 6 STEP 15 Add your name and/or watermark Layers >> Merge >> Merge All Flatten Resize if desired Save as a jpg and we're done. I hope you enjoyed this tutorial! If you have any questions or would just like to show me your result EMAIL ME VERSIONS FROM MY TRANSLATORS Thank you Karin, DesignPSP.NL (The Netherlands)
BACK TO TUTORIALS - PAGE 1 |

