
|
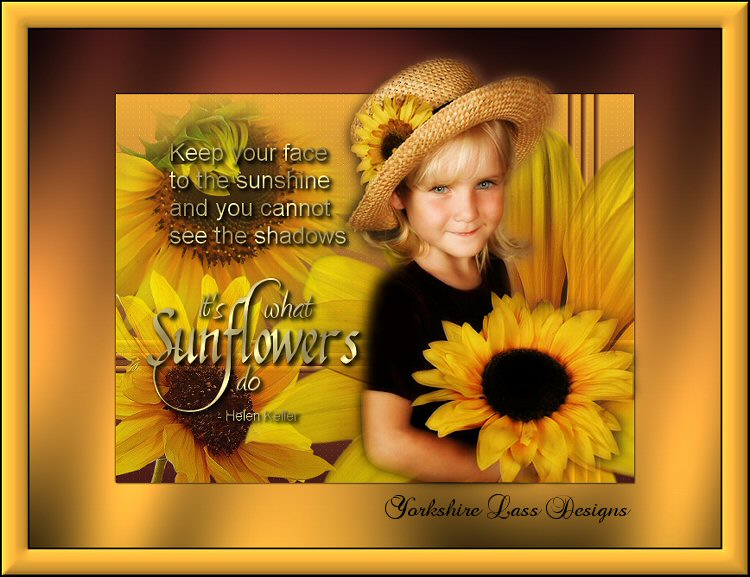
This tutorial is my own design and any resemblance to any other tutorial is purely coincidental. It was created in Paint Shop Pro V8. © 2009 Yvonne - Yorkshire Lass Designs - All rights reserved ~ Revised March 2012 ~ You will need the following to complete this tutorial: Tubes anna.br_girassol_03-10-09.psp 1881-luzcristina.psp cat tube 254 Juillet 09.psp yp_makenna_sunflowergirl02.pspimage yp_wordart_sunshine.psp yp_wordart_sunflowers.psp The above can be downloaded here Extract to a file on your computer then open in PSP and minimise Plugins Penta.com >> Color Dot Graphics Plus >> Cross Shadow Available here PSP Designer Studio Extract to your PSP Plugins folder ********** Drag this arrow with you to mark your place in the tutorial ********** STEP 1 Open a new canvas 800 x 600 pixels transparent background STEP 2 In the Materials Palette load Foreground with Brown #481918 and Background with Orange #EEAB39 Make a Foreground-Background gradient Style = Linear 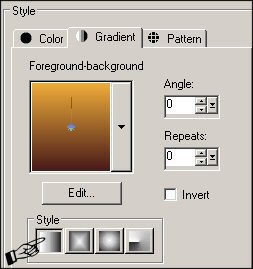
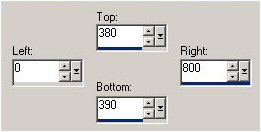
Flood fill canvas with gradient Effects >> Plugins >> penta.com >> Color Dot With the following setting 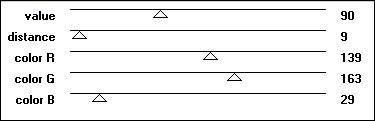 STEP 3 Layers >> New Raster Layer Select Selection Tool >> Selection Custom Selection 
STEP 4 Flood fill selection with gradient Effects >> 3D Effects >> Drop Shadow 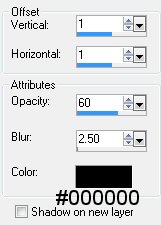
Repeat Drop Shadow changing the Vertical and Horizontal Offsets to minus 1 (-1) Selections >> Select None STEP 5 Layer >> New Raster Layer Select Selection Tool >> Selection Custom Selection 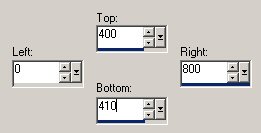
STEP 6 Flood fill selection with gradient Effects >> 3D Effects >> Drop Shadow
Repeat Drop Shadow changing the Vertical and Horizontal Offsets to minus 1 (-1) Selections >> Select None STEP 7 Layers >> New Raster Layer Select Selection Tool >> Selection Custom Selection 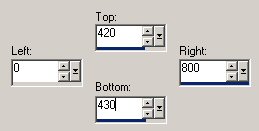
STEP 8 Flood fill selection with gradient Effects >> 3D Effects >> Drop Shadow
Repeat Drop Shadow changing the Vertical and Horizontal Offsets to minus 1 (-1) Selections >> Select None STEP 9 In the Layer Palette close Raster 1 (the bottom layer) and highlight Raster 4 (the top layer) Layers >> Merge >> Merge Visible Open Raster 1 STEP 10 In the Layers Palette make sure the merged layer is highlighted Layers >> Duplicate Image >> Rotate >> Free Rotate 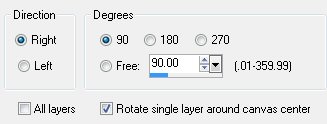
With Move Tool reposition so that left-hand bar is at 700 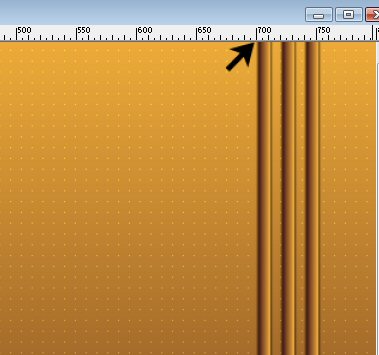
STEP 11 Maximize tube 1881-luzcristina.psp Edit >> Copy Minimise tube Edit >> Paste >> Paste as New Layer Image >> Mirror With the Move Tool position in left top corner STEP 12 Maximise tube anna.br_girassol.psp Edit >> Copy Minimise tube Edit >> Paste >> Paste as New Layer Image >> Mirror With the Move Tool position in bottom left corner In the layer palette reduce the opacity to 72% STEP 13 Maximise tube cat tube254juillet09.psp Edit >> Copy Minimise tube Edit >> Paste >> Paste as New Layer With the Move Tool position in bottom right corner In the layer palette reduce the opacity to 72% This is what you should have now 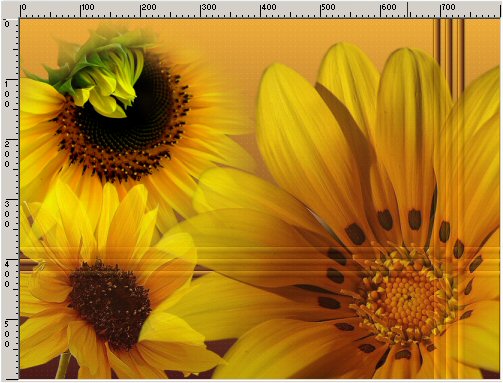
STEP 14 Layers >> Merge >> Merge Visible Image >> Resize 75% All layers unchecked Effects >> 3D Effects >> Drop Shadow
Repeat Drop Shadow changing the Vertical and Horizontal Offsets to minus 1 (-1) STEP 15 Layers >> New Raster Layer Flood fill with Gradient Effects >> Plug Ins >> Graphics Plus >> Cross Shadow 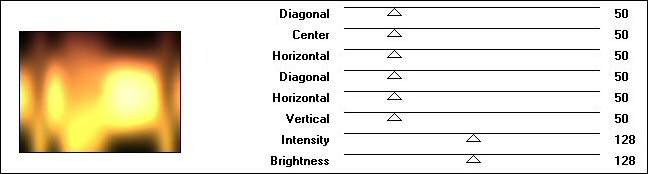
Image >> Flip When you flip the image you may end up with a gap at the top With the Move Tool adjust the layer so that there are no gaps Layers >> Arrange >> Send to Bottom STEP 16 Maximise yp_makenna_sunflowergirl02.pspimage Edit >> Copy Minimise tube Edit >> Paste >> Paste as New Layer Layers >> Arrange >> Bring to Top Image >> Resize 90% All layers unchecked Adjust >> Sharpness >> Sharpen With the Move Tool position tube to the right (see finished image for placement) STEP 17 Maximise yp_wordart_sunshine.psp Edit >> Copy Minimise tube Edit >> Paste >> Paste as New Layer With the Move Tool adjust position (see finished image for placement) STEP 18 Maximise yp_wordart_sunflowers.psp Edit >> Copy Minimise tube Edit >> Paste >> Paste as New Layer With the Move Tool adjust position (see finished image for placement) STEP 19 Layers >> Merge >> Merge All (Flatten) STEP 20 Image >> Add Borders 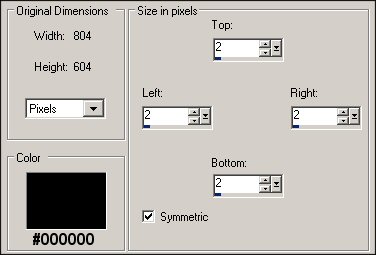
STEP 21 Image >> Add Borders 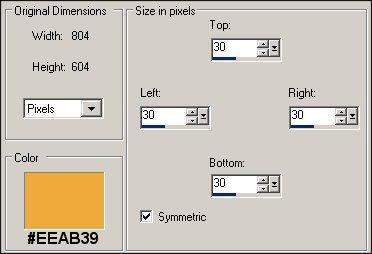
STEP 22 With the Magic Wand select the orange border Effects >> 3D Effects >> Inner Bevel 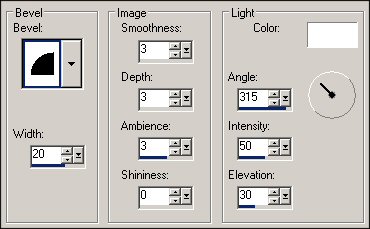
Selections >> Select None STEP 23 Add black border as in STEP 20 STEP 24 Add your watermark or any other text Layers >> Merge >> Merge All (flatten) Resize if desired and save as a jpg. I hope you enjoyed this tutorial! If you have any questions or would just like to show me your result EMAIL ME BACK TO TUTORIALS- PAGE 1 |